

How To Clean Up Skin On Photoshop
Whether I'm taking portraits of models or photographing seniors, it'southward my job to make my model expect amazing. This includes retouching skin to remove blemishes and smooth out any imperfections.
Many advanced retouchers of portrait, glamour and model photography spend hours in front of their computer smoothing pare, cellulite and removing blemishes.
In this tutorial, I will show y'all how to remove blemishes and smooth a person's skin in Adobe Photoshop. I'll start with a simple procedure that volition chop-chop create silky pare. Then I'll show you more than advanced processes used by many of the pros.
With any tutorial, it'south a expert idea to follow forth pace-by-pace. So take hold of an epitome, open your Photoshop and let's go!


Removing Blemishes in Photoshop
I e'er beginning image adjustments by removing temporary blemishes. These include acne, discolorations, or scratches. I more often than not don't remove any permanent features unless my model specifically asks me to. Freckles, scars, moles, and other beauty marks make each person distinctive.
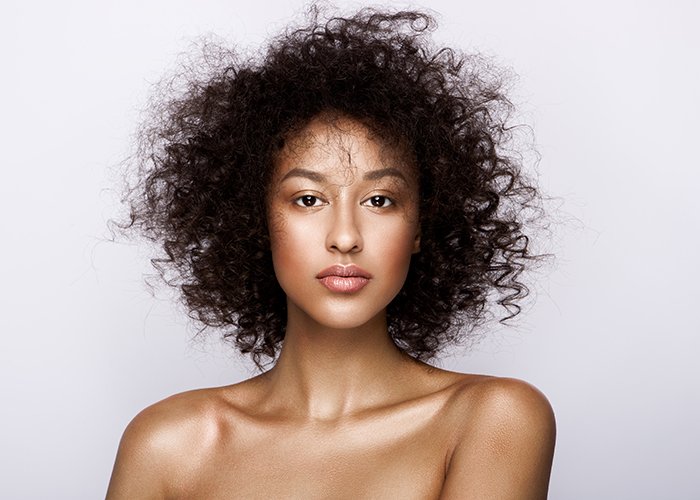
Here is an prototype of a beautiful local model who I photographed a few years back. I'chiliad going to zoom in tight on her face while I work through this tutorial.

I create a copy of my image in a new layer in Photoshop and name it "Blemish Removal". Creating a new layer with each modify is a expert habit to get into. This ensures that yous can hands become back to a previous step. Or you tin can endeavor out different procedures and compare the deviation.
If you oasis't created a duplicate layer before, get to Layers>Indistinguishable Layer or select the layer and click Ctrl or ⌘J.
First, I'm going to work with the Spot Healing Brush tool. The icon in the toolbar looks like a bandaid with a bump on it. I use a soft brush (about 30% hardness) that is set to content-aware make full.
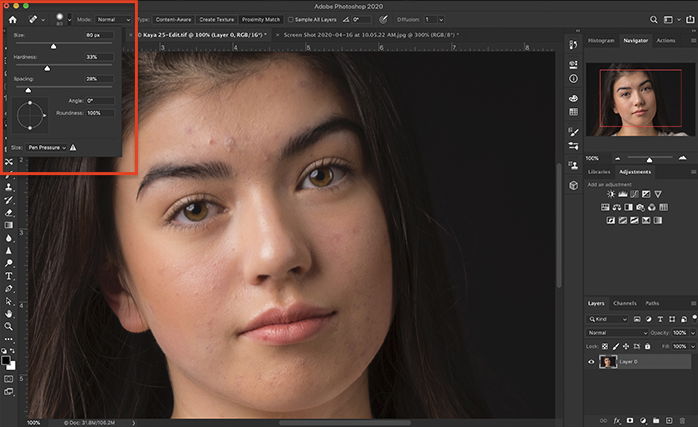
I size the brush simply larger than the blemish that I'm removing. I can easily resize the castor using the bracket keys. "[" makes the castor smaller. "]" makes the brush larger.
Now, click on the blemish. Similar magic, it's gone!
Photoshop uses information from the area surrounding the spot making it seamlessly vanish. If the blemish doesn't completely disappear, click on information technology over again with a slightly larger castor.
I continue clicking blemishes until I replace every spot with clear pare.
If you lot want more than command or if the Spot Healing Castor isn't giving you the look that yous want, use the Healing Brush tool.
To activate the Healing brush tool, I select a clear area of skin close past the blemish using the Option cardinal (Alt key on PC). Peel varies in texture and colour. A forehead may be different in texture from the cheek. To go on the skin texture, I want to try and match every bit closely as possible the skin tone and texture.
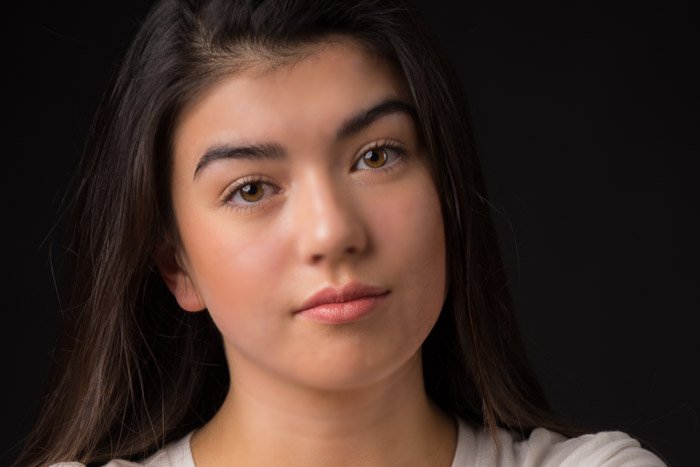
Removing blemishes goes a long manner to smoothing my model's skin. Compare the earlier and after image.


How to Polish Pare with Photoshop
I'g going to show you iii means of smoothing pare in Photoshop. The offset two are easier and useful for beginning portrait photographers. The last is a more advanced method, only it retains the texture of the peel.
All methods add blur, which gives the skin a silky smoothness.
Blur Tool
The easiest way to smooth skin in Photoshop is to apply the Blur tool. This tool looks like a h2o drop in the toolbar. This tool smoothes skin, but it doesn't allow you a lot of control over the smoothing effect.

Step 1 – Create a New Layer
Select the "Blotch Removal" layer and re-create it to a new layer. Layer>Duplicate Layer (Ctrl or ⌘J). I labelled my new layer "Smooth Skin 1".
Step 2 – Add Blur
Select the Blur tool and make sure the percentage is set to 100%. Paint the blur direct on to the model'south pare. The blur consequence only applies to the skin. I carefully avoid blurring eyes, hair, lips, background, or clothing.
If the result is as well strong, undo the Blur tool (Ctrl or ⌘Z) and lower the per centum. Compare the before and afterwards prototype.
Filter Blur
To add more control over the softening effect, utilize a Filter blur instead of the Blur tool. Y'all tin can use either Gaussian blur or Surface mistiness as a smoothing effect. Gaussian blur adds a more romantic glow to the portrait. Experiment with both types of blur and choose the 1 you like best.
Step i – Create a New Layer
Select the "Blemish Removal" layer and re-create it to a new layer. Layer>Indistinguishable Layer (Ctrl or ⌘J). I labelled my new layer "Smooth Skin two".
Step 2 – Add together Blur
Go to the Filter dropdown menu. Select Blur>Gaussian Blur.
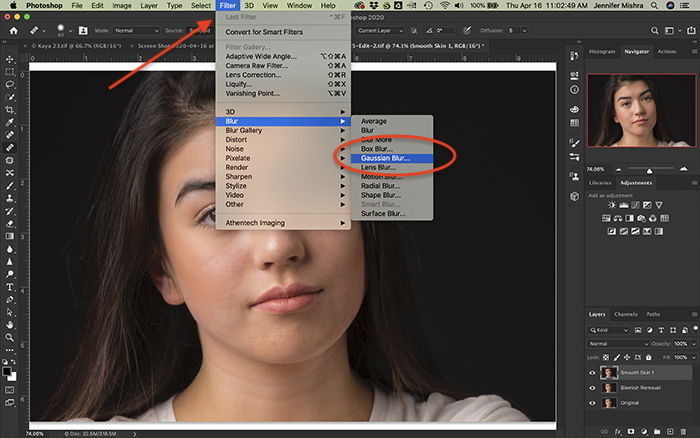
Y'all don't demand very much blur. v to 10 pixels should exercise it depending on the resolution. Besides, reduce the layer opacity to l%. If you add too much blur, you'll take out the pare's texture and the photo won't expect natural.
Surface blur (Filter>Blur>Surface Blur) will give yous a slightly different await, but the procedure is the same as when adding Gaussian blur. I use a Radius of 5 and Threshold of 25 to start.
Click ok.
Step 3 – Utilise Blur to Pare
The blur effect simply applies to the skin. I don't want to blur eyes, hair, lips, background, or habiliment. I'yard going to hide the blur with a layer mask and pigment information technology only on to the pare.
If you've not created a layer mask earlier, click on the "Smoothen Skin" layer then the layer mask tool below it. This tool looks like a rectangle with a circle inside. A white rectangle should appear beside the "Smoothen Peel" layer.
Click on the white layer mask and invert information technology by selecting Epitome>Adjustments>Invert (Ctrl or ⌘I). Your layer mask should turn blackness hiding your Gaussian blur.
In that location's a shortcut for this process. Agree the Selection cardinal (Alt key on PC) before clicking the layer mask tool and Photoshop will create an inverted layer mask.
Using a white paintbrush tool, I paint the blur onto my model's skin. Don't forget the cervix! If you lot accidentally add blur in an area that should non be blurred, switch to a black paintbrush (click the "10" key) and erase the blur.
The upshot should be subtle. If you'd like a bit more than blur, increase the opacity of your layer. Compare the before and after paradigm.

High Pass Filter
Using the High Pass filter in conjunction with a Gaussian mistiness creates a softer smoothing consequence in Photoshop. This process gives you the most control while withal retaining the skin'southward texture. The process is a little bit involved and the results may look strange equally nosotros go through the steps, but stick with me. The concluding issue volition create smooth skin.
Step 1 – Create a New Layer
Click the "Blotch Removal" layer and copy it to a new layer. Layer>Duplicate Layer (Ctrl or ⌘J). I labelled my new layer "High Pass Filter" and reduced the opacity to fifty%.
Step 2 – Add High Pass Filter
Now, I'm going to add a Loftier Laissez passer filter to my image. I do this by going to Filter>Other>High Pass… A High Pass filter is designed to notice edges or item. I ofttimes use this filter to sharpen slightly blurred images. I'm going to invert the outcome later, so rather than affecting edges, the effect will focus on the apartment surface of the skin.
I utilise a radius of between twenty and 25 pixels.
Click OK.
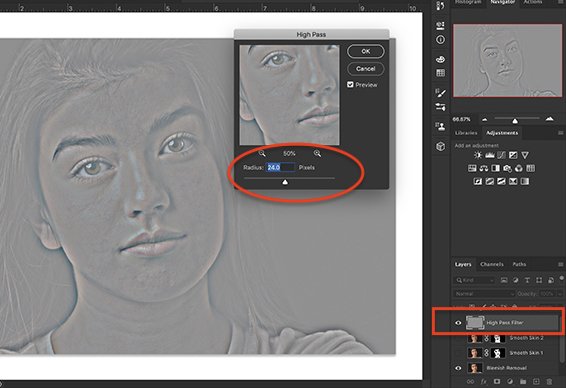
When you lot employ this filter, your image will turn gray and you will come across the edges of the person'southward face in outline.
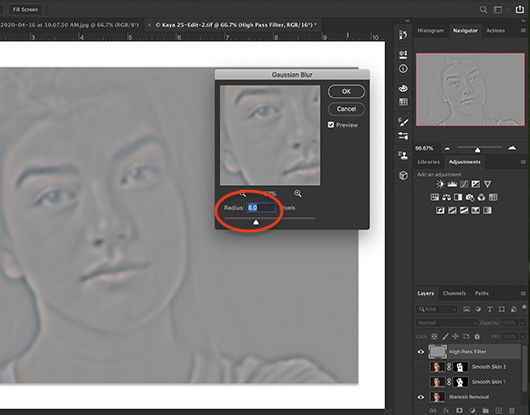
Pace 3 – Add Blur
The next step is to add a blur just as I did in the previous procedure. Go Filter>Blur>Gaussian Blur. Add between v to x pixels.
Click OK.
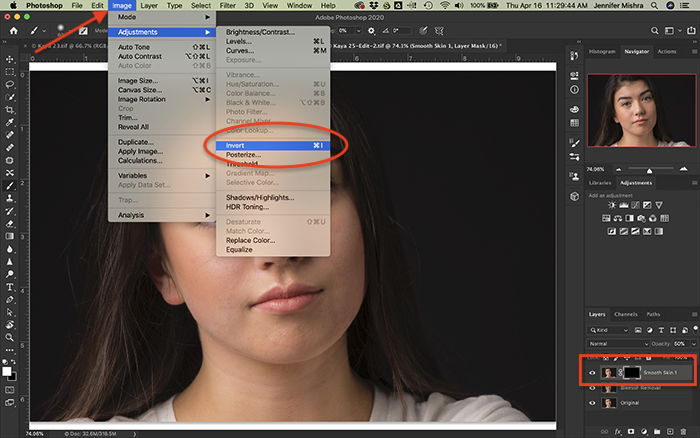
Step 4 – Invert Event
Brand certain the High Pass layer is selected and invert the issue by going to Image>Adjustment>Invert (Ctrl or ⌘I).
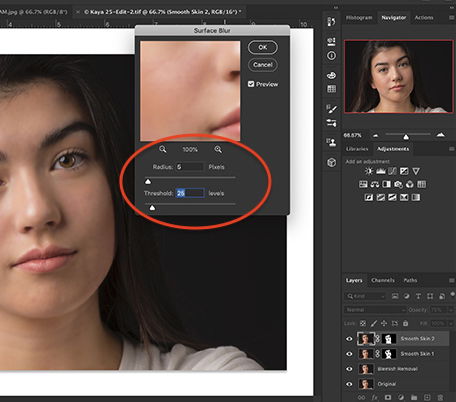
Stride v – Change Alloy Options
I'grand going to change 2 blending options. I starting time by opening the Blending Options dialogue box. You can do this by double-clicking on the layer, right-clicking on the layer and selecting Blending Options, or by selecting Layer>Layer Style>Blending Options. This console lets me control how my Loftier Pass layer interacts with the layers underneath.
First, I change the blend manner to Linear Low-cal.
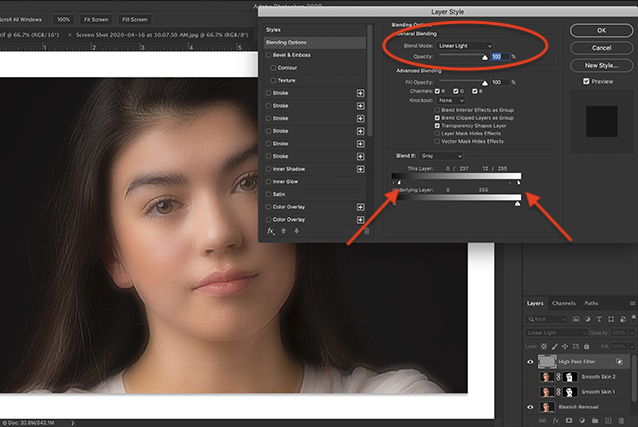
So I get down to the sliders at the bottom of the panel. These are called the "Blend if" sliders. I'm interested in the slider labelled "This Layer".
With this slider, I control how the lights and darks in my High Pass layer blend with other layers. At that place's a dark triangle on the left and a light triangle on the right cease of the slider. I'grand going to motion my lite triangle to the left and the nighttime triangle to the correct. Non quite all the style to the end of the slider, but almost. The number on the left will modify to somewhere around 0 / 235. The number on the right will alter to somewhere around 10 / 255
Merely I want to do this subtly.
I'm going to move HALF of each triangle. To practise this, I hold the Selection key (alt key on PC) while dragging the slider. The triangle should divide in half.
Click OK.
Step vi – Apply Mistiness to Pare
I'm going to hide the blur with a layer mask and pigment it only onto the peel. Create an inverted layer mask by holding the Option fundamental (Alt key on PC) while clicking the layer mask tool.
Using a white paintbrush tool, I paint the blur onto my model's skin.
If you'd like a bit more blur, increase the opacity of your layer. If you lot'd like a lilliputian less of the consequence, lower the opacity level. Compare the before and later on image.

Photoshop Action
Softening pare using a Loftier Laissez passer filter Blend if involved quite a few steps. It's a good idea to go through each step of this tutorial to understand the process.
But I'm often post-processing dozens of images from each portrait shoot. To make this process easier, I've created a Photoshop action that I'll share with yous. You tin download my action and import information technology into your Photoshop. Follow this pace-by-stride tutorial.
Download Smooth Pare Activeness.
To run the Soft Skin by Jenn Mishra activeness, first, create a duplicate layer. Run action past clicking on the triangle icon under the action console. The action includes creating an inverted mask. Afterward the activity runs, you're ready to paint the softness on to your model's skin with a white paintbrush.
Determination
At that place are many ways to smoothen peel in Photoshop. In this tutorial, I showed you lot three ways of smoothing skin and how to remove blemishes on a person's face.
The Blur tool is the simplest way to smooth skin, simply it is a basic consequence and doesn't allow the photographer a lot of control. Adding Gaussian or Surface blur increases control. The process of adding a High Pass filter plus blur increases the natural look by retaining the pare'southward texture.
Here is my final image showing before and later I applied the High Pass filter skin softening.

If you lot'd similar to work in Lightroom instead of Photoshop, check out how to smooth skin in Lightroom.
To boot-showtime your portrait photography business, don't miss out on our eBook – Profit from Portraits!

Source: https://expertphotography.com/smooth-skin-photoshop-portrait-photography/
Posted by: chambersalfic1981.blogspot.com
0 Response to "How To Clean Up Skin On Photoshop"
Post a Comment